
I’ve done quite a few of these now and they’re pretty simple. VMware puts out new drivers and security patches on a regular basis for the ESXi platforms.
If you have vCenter Server (Appliance) you have full licensing and can use the confusing update manager built-in. However, this doesn’t automatically schedule updates of the servers. To properly update the servers they should have each VM shut down and the host should be in maintenance mode. I haven’t investigated yet whether this can be automated. I just do it manually every so often.
The process:
- Log into your ESXi host using whatever your preferred method is
- Gracefully shut down all your VM’s
- Place the host server into the management mode
- Connect to the host with SSH (you may need to turn this on as it’s off by default) and log in as root user
- Open a web browser to: VMware ESXi Patch Tracker
At this point you need to determine which version you currently have in order to know what you’re updating to.
From the SSH command prompt:
vmware -vl
You should see a response like this:
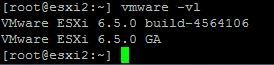
Obviously I have already updated my host to 6.5 but the command works on any ESXi host from version 4 and up.
In the past I have always gone from 5.x to 6.0 to 6.5 standard (GA release) then patched 6.5 to whatever the current level is. However, it turns out this extra step isn’t actually necessary – I jumped from 5.5 directly to 6.5 GA without incident.*
One other thing I have found is the SWAP memory settings are often lost in the conversion. I’ll detail how to update that below.
Ok – so now you are ready to update. From the SSH command prompt, enter the following:
esxcli network firewall ruleset set -e true -r httpClient
esxcli software profile update -p ESXi-6.5.0-4564106-standard \
-d https://hostupdate.vmware.com/software/VUM/PRODUCTION/main/vmw-depot-index.xml
After a while it will seem like nothing is happening but in fact the ISO of the build you specified is being downloaded and installed. Eventually you’ll see this:

Update Result
Message: The update completed successfully, but the system needs to be rebooted for the changes to take effect
Reboot Required: true
Type “reboot” at the prompt and give the system a few minutes to reboot.
I always start with the GA initial release because as VMware updates the builds they insert new drivers and other code that may not be included with every build release. I review each build release on the patches page (link above) to see what exactly each build is updating. If I see a release where only the esx-base, vsan, vsanhealth is updated, I skip the build until I see things like ehci-ehci-hcd, esx-ui, esx-tboot, misc-drivers, etc… This ensures that I am getting everything included to the host server as I go along. This could mean several installs and reboots, but it’s better to be thorough than try to figure out why your host isn’t behaving as expected with a NIC driver, or RAID array management.
The syntax for the update is always the same:
esxcli software profile update -p <<build goes here>> -d https://hostupdate.vmware.com/software/VUM/PRODUCTION/main/vmw-depot-index.xml
When done you can optionally turn the firewall back on to restrict httpClient access from the host:
esxcli network firewall ruleset set -e false -r httpClient
When all updates are completed, log into the UI now provided by the host (https://esxihost/ui) and exit maintenance mode. I usually just reboot to stat up the VM’s but if you don’t have auto-start enabled you’ll have to start up each VM separately.
The fun doesn’t stop there. Once the host has been fully updated all of the VM’s will need their VMware Tools installs updated. If you edit the VM and set the Tools to upgrade automatically it *should* just work. The old Tools install should upgrade and force a reboot of the VM. This usually requires some patience on your part because it takes a while for each VM to upgrade.
I have found that the tools don’t always upgrade though, even if set to automatically upgrade. One common issue is no CD-DVD ROM virtual drive has been installed (or was removed for some reason). Without it, the ISO image of the VMware Tools software cannot mount and therefore cannot be run. Check each VM to ensure you have a working CD-DVD ROM set to connect on startup.
Another item to note is that the Virtual Machine Hardware Version doesn’t automatically update with each VM either. This also must be done manually and you should pay special care to ensure the VMware Virtual Machine Hardware Version is compatible with your VM. I haven’t yet found an instance where the version had to be kept back to a old version but do your homework. The version of the drivers (video, network, drives, audio, etc.) depends on it.
To update the Hardware Version log into the UI and click on the VM you want to update. Make sure it’s powered down, then click on Actions and click on Upgrade VM Compatibility.
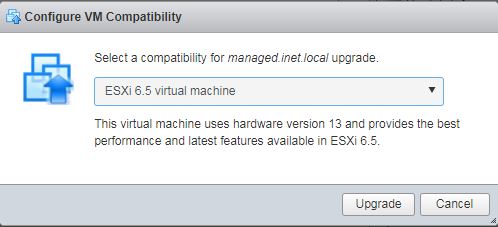
Select the appropriate version for your VM and click on Upgrade.
This will cause the VMware Tools to go through the process of upgrading again, which in turn will cause your VM to reboot again. If you know in advance what you want to set the compatibility to, do this while the host server is still in maintenance mode and before you power up each VM for the first time after the host updates are completed (which is also a good time to check the status of your CD-DVD ROM for each machine).
*NOTE – If you jump from 5.x to 6.x you MUST obtain a new license. If it’s a free license just register again. If not you will need to use the VMware license manager to upgrade your licensing to the current version (runs a conversion process). You need to log into https://my.vmware.com to do this. Don’t forget to update the license!
